en English
Untitled English subtitles
Report a problem
Advertisement
English transcript
All right.
So during the last video, I already showed you how to download
androidparty.jpg and how to move it into the drawable folder.
If you're having difficulty with these two, go ahead and rewatch the videos, or
go to the forums and ask other students for help.
The rest of these, we're going to go ahead and
do in Android Studio right now.
Okay, so this is my happy birthday application code.
Specifically, I'm looking at the file activitymain.xml, which is inside of
the layout folder, right here, so make sure you're looking at the same file.
Now one of the things that we needed to do was remove the padding, and
I showed you how to do this in the video but I'm going to do it again.
These four attributes right here,
I'm not really interested in having right now.
Okay, so that was pretty easy.
The next I want to do is go ahead and make another TextView.
That should be super easy because I already have a TextView right here that
I can model it off of.
I'm in fact going to go ahead and copy this TextView and paste.
Now the TextView I'm adding is supposed to say from, and then your name.
So I'm going to change that right now, and
I changed this specific attribute because it's the text attribute.
Okay so I've done two out of the four things.
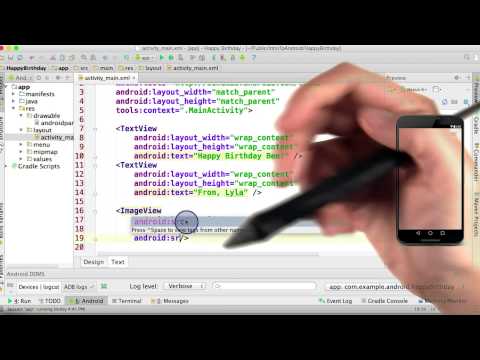
Now I'm going to go ahead and add the ImageView.
Now I don't have an ImageView to copy off of, so
I'm just going to start typing.
If you don't remember what an ImageView looks like you can go ahead and
check out the XML cheat sheet that we've provided for you.
One of the neat things that Android Studio does
is when you start typing something it'll pop up with a little auto-complete menu.
Since what I wanted was an ImageView I'm going to go ahead and click on it.
Well this is super helpful, because it gave me the android:layout_width and
android:layout_height attributes without me needing to type them.
I'm going to go ahead right now and
just make these wrap_content just like the TextViews.
And you can see how I don't even need to finish typing, I can just click on it.
Okay, now if we go over here and look at the phone preview, I can see that it
says Happy Birthday and I can just barely see that it says from Lyla.
So, these two TextViews seem to be displayed somewhat correctly but
I'm not getting any sort of image down here.
That's because I still need to define the source attribute of the image view.
After all, I haven't said what picture I actually want to show.
So I'm going to go ahead and start typing that right now.
I'll start with android, again, the auto complete pops up with src,
so to save on typing I'll go ahead and click it.
The auto complete even guesses what should come next.
And if you remember from the lecture, I need to type @drawable.
Now the question is, what comes after here?
Well what comes after here is the name of the picture that I want to display,
and more importantly that picture has to exist in the drawable folder.
So over here, inside the rows folder, inside the drawable folder,
I have androidparty.jpg, which is the image that I moved over.
This is the image that I want to use.
It's in the correct place.
All I need to do is type the name without the file extension,
which would be androidparty.
Okay, and almost immediately you should see that the picture appears.
Now this is looking pretty good, so great job so far.
But before you move on, you should always,
always, always, actually run your app on your phone.
So I'm going to do that by coming up here to the green run button.
And clicking on it, it's going to think for a little bit, and
I could see that it's processing down here.
Okay, and once this window pops up,
as long as my phone is plugged into my computer and everything is set up
like we showed before, I should be able to select the phone, and then hit OK.
Okay, so this is actually pretty awesome.
Our phone looks a lot like the example phone that we have down here.
We got ImageView, we got our two Text Views up here.
And we pretty much confirmed everything's working as expected at
this point.
Just going through the checklist items I've added a TextView that says,
>From Lyla.
I've also added the androidparty ImageView right here.
I went ahead and removed that extra default padding and
I click the green arrow and ran my app.
Neat.
So at this point you're ready to move on and
fix this pesky little problem where our views are overlapping one another.